Authentication, Funding & Withdrawals
Welcome to the Lightspark Connect Developer Guide. This is the first in a series of technical guides designed to walk you through the integration of Lightspark Connect, enabling you to harness the power of the Lightning Network for near instant, low-cost Bitcoin transactions.
This guide covers four areas:
- Authentication: Setting up secure access to the Lightspark platform
- Node Funding: Understanding the process of adding funds to your Lightspark account to fund Lightning transactions
- Balances: Interpreting the different types of account balances
- Withdrawals: Learning how to move funds out of your account back onto L1
By the end of this guide, you'll have a solid foundation for building Lightning-enabled applications using Lightspark Connect. In subsequent guides, we'll delve deeper into sending and receiving payments, testing, and launch processes. Let's get started with authentication and funding.
This section will guide you through creating API credentials, setting up authentication, and understanding Operation Signing Keys (OSK) model for secure interactions with the Lightspark platform.
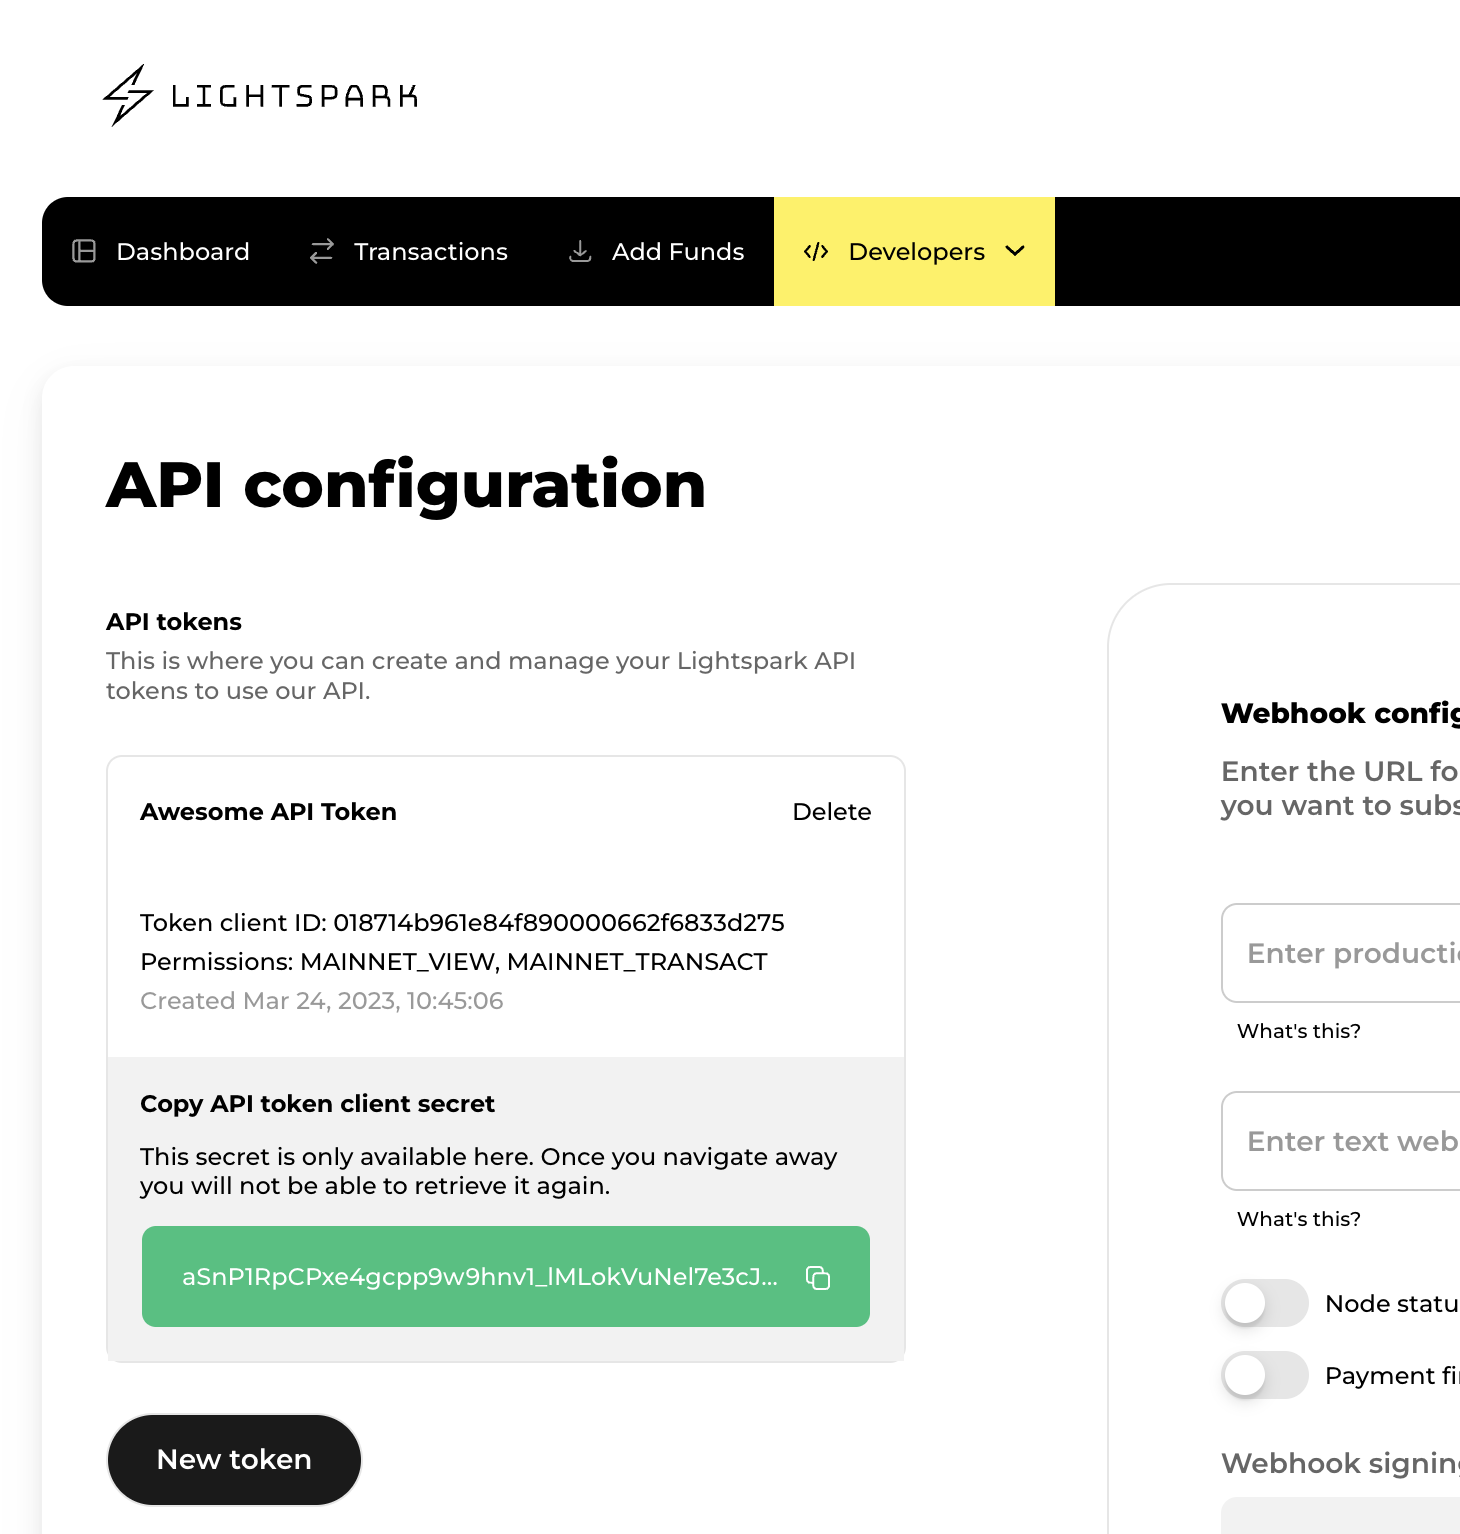
- Log in to your Lightspark dashboard.
- Navigate to the "Developers > API Config" section.
- Click on "New Token".
- You'll receive a Client ID and Client Secret. Make sure to store these securely, as the Client Secret will only be shown once.
Remember, these credentials are the keys to your Lightspark account. Never share them publicly or commit them to version control systems. It's recommended to use environment variables or a secure secret management system to store these credentials.
Lightspark provides SDKs that simplify interacting with the Lightspark API.
With your API credentials, you can now configure SDK client authentication.
import { AccountTokenAuthProvider, LightsparkClient } from "@lightsparkdev/lightspark-sdk";

const API_TOKEN_CLIENT_ID = process.env.LIGHTSPARK_API_TOKEN_CLIENT_ID;
const API_TOKEN_CLIENT_SECRET = process.env.LIGHTSPARK_API_TOKEN_CLIENT_SECRET;

const client = new LightsparkClient(
  new AccountTokenAuthProvider(API_TOKEN_CLIENT_ID, API_TOKEN_CLIENT_SECRET)
);
The code snippet instantiates a
LightsparkClient and passes in your API credentials.Operation Signing Keys (OSK) are an additional security feature for Lightspark Connect. Any request that moves money out of your account needs to be signed with the Operation Signing Key.
OSK enables you to control the signing key used for payments on Lightspark. Here's a high-level overview of how OSKs work:
-
Key generation and storage: When you first create a node, your browser generates the Operation Signing Key pair and encrypts the private key with the password you provide. Lightspark never has access to the unencrypted value. Your encrypted private key is then persisted on Lightspark services and public key on your node for validation
-
Key loading: Before performing sensitive operations, you need to load the signing private key for your node. The SDK can help you download your OSK private key and decrypt it with the password you set when creating the node. For REGTEST ("test mode") this password is
1234!@#$ -
Signing requests: Once the key is loaded, the SDK automatically signs sensitive operations, and adds the signature to the header. To learn more about signing requests manually, you can review this doc
const NODE_ID = process.env.LIGHTSPARK_NODE_ID;
const NODE_PASSWORD = "1234!@#$"; // In a real scenario, this should be securely stored
client.loadNodeSigningKey(NODE_ID, { password: NODE_PASSWORD, });
Once you've set up authentication, the next step is to add funds to your Lightspark account.
Your node uses a L1 wallet to initially receive funds before creating a channel with Lightspark routing nodes. To fund your node, first request a L1 node wallet address.
const fundingAddress = await client.createNodeWalletAddress(NODE_ID);
The funding process involves two steps:
- An L1 (on-chain) transaction to send Bitcoin to the node wallet
- The node automatically uses funds from the node wallet, initiating a second L1 transaction to open a zero confirmation channel with Lightspark routing nodes.
Depending on the deposit size, your balance will update after 3 or 6 confirmations.
- ≤ 0.16777215 BTC: 3 confirmations
- 0.16777215 BTC: 6 confirmations
For larger funding amounts, multiple channels may be opened.
On REGTEST, Lightspark provides APIs to simulate the funding process without using real Bitcoin. You can simulate funding in the dashboard or programmatically with the following:
const fundNodeOutput = await client.fundNode(NODE_ID, 200000);
if (!fundNodeOutput) {
  throw new Error("Unable to fund node");
}
console.log(`Funded amount: ${fundNodeOutput.originalValue}`);
This code snippet uses the
fundNode method to simulate funding your node with 200,000 satoshis (0.002 BTC). In Test Mode:- No real Bitcoin is sent or received.
- The funding is instant and doesn't require confirmations.
You can set up webhooks to track the status of your funding transactions. Here's how you can listen for the
FUNDS_RECEIVED event. For additional webhooks, check out the Webhook documentationCreate a webhook endpoint on your server. Choose a URL path (e.g.,
/webhook) and make sure the endpoint accepts POST requests.const express = require('express');
const app = express();
app.post("/webhook", (req, res) => {
// We'll handle the webhook here
res.send("OK!");
});
app.listen(3000, () => {
console.log("Server listening on port 3000");
});
Configure webhook settings on the Webhook Config Page.
- Set the URL for your webhook (use different URLs for test and production modes)
- Select the
FUNDS_RECEIVEDevent to subscribe to - Get the ebhook signing key to verify the webhook was sent by Lightspark
There are three steps to handling Ligthspark webhooks
- Verify the event is from Lightspark
- Parse the event
- Query Lightspark API to get the full resource details
We provide a helper method
verifyAndParseWebhook in our SDKs to verify the event signature. For every incoming request, you should make sure the request is coming from Lightspark. Here's how you can use it in TypeScript:import express from "express";
import {
WebhookEvent,
WebhookEventType,
WEBHOOKS_SIGNATURE_HEADER,
verifyAndParseWebhook
} from "@lightsparkdev/lightspark-sdk";
const app = express();
app.post("/webhook", (req, res) => {
const event = await verifyAndParseWebhook(
req.body,
req.headers[WEBHOOKS_SIGNATURE_HEADER],
({}).LIGHTSPARK_WEBHOOK_SIGNING_KEY
);
if (event.event_type === WebhookEventType.NODE_STATUS) {
const node_id = event.entity_id;
// You can now fetch the details of the node using the SDK
} else if (event.event_type === WebhookEventType.WALLET_INCOMING_PAYMENT_FINISHED) {
const paymentId = event.entity_id;
const walletId = event.wallet_id;
// You can now fetch the details of the payment using the SDK or notify the user via
// their wallet ID.
}
res.send("OK!");
});
app.listen(3000, () => {
console.log("Server listening on port 3000");
});
After verifying the webhook event, you verify the
eventType. Other useful fields include:- event.timestamp: indicates when the event occurred
- event.entity_id: a unique identifier for the updated entity
Example of a parsed event:
{
  "timestamp": "2023-03-30T19:16:25.273202+00:00",
  "event_type": "FUNDS_RECEIVED",
  "api_version": "2023-09-13",
  "event_id": "0187542e-86eb-f96b-0000-ec20c64dfad1",
  "entity_id": "Deposit:0185789d-9948-f96b-0000-4ae0b696c75f"
}
It's important to understand that Lightspark webhook events serve as notifications – in this case, it tells you that a deposit occurred. But it doesn't include detailed information about the action. To get more data, you'll need to query the relevant entity using the provided
entity_id.When handling events, keep these considerations in mind:
-
API Evolution: As the Lightspark API evolves, new fields may be added to the webhook data. Make sure your code is resilient to unexpected fields in the request.
-
Timely Response: Your endpoint MUST return a 2xx HTTP status code. If you encounter an error, Lightspark will retry with exponential backoff.
Once you have the
entity_id, you can use the Lightspark SDK to fetch full details of the deposit. Here's how you can do this.let deposit = await client.executeRawQuery(
getDepositQuery("Deposit:018d8ee3-4443-066a-0000-09a8c905d29e"),
);
After querying the deposit object, Lightspark SDKs automatically handle deserializing and you'll receive a response object that looks like the following:
{
  "id": "Deposit:018d8ee3-4443-066a-0000-09a8c905d29e",
  "createdAt": "2024-02-09T17:21:15.331044+00:00",
  "updatedAt": "2024-02-09T20:20:01.084938+00:00",
  "status": "SUCCESS",
  "amount": {
    "originalValue": 80000,
    "originalUnit": "SATOSHI",
    "preferredCurrencyUnit": "USD",
    "preferredCurrencyValueRounded": 5270,
    "preferredCurrencyValueApprox": 5270.092226613966
  },
  "blockHeight": 829721,
  "destinationAddresses": [
    "bc1qsffw04rxcwq4dcqzypzy6cld48e3utjgx9v4etzulfr22xfkyhrs9fzx22"
  ],
  "destinationId": "LightsparkNodeWithRemoteSigning:018d4725-34a4-88df-0000-399e65a28da7",
  "typename": "Deposit",
  "resolvedAt": "2024-02-09T17:21:15.331044+00:00",
  "transactionHash": "36dd46eb56eba8bce198375912c720a7745b6b5d5507482d0c7fdfc09f16eaba",
  "blockHash": "00000000000000000002dd92ff8482a79592e40c19b22c4e5d5ce81ea0eebdc4",
  "numConfirmations": 24028
}
Lightspark represents several balance types for your node:
-
Available Balance: This represents the funds that can be used for Lightning transactions. It represents your total balance - channel reserves
-
Total Balance: This includes the available balance plus any funds that are currently locked in pending transactions or channel reserves. This represents the total amount owned on the node and can be withdrawn to L1
A small amount of funds reserved in each channel. These funds are typically held to fund a L1 channel close transaction.
- The dust limit is typically 354 satoshis plus the size of a transaction (43 vbytes * current L1 transaction fee per vbyte).
Use the following code to check your node's balance:
const account = await client.getCurrentAccount();
if (account) {
  let node = await account.getNodes(client, 1, [BitcoinNetwork.MAINNET], [NODE_ID]);
  console.log(`Available balance: ${node.entities[0].balances?.availableToSendBalance.originalValue}`);
}
This will return the available balance in satoshis. For a more detailed balance breakdown, you can access other properties of the
balances object. The balances object returned by the API provides detailed information about your node's financial state.Reference the Balances object documentation for a complete list of properties.
Set up webhooks to monitor for high and low balance events. These alerts help you optimize your capital allocation. You can use these events to trigger additional withdrawals or deposits to the node.
High balance alerts prevent you from holding excessive liquidity in your account. Low balance alerts ensure you always have sufficient liquidity to process transactions.
Set up these alerts in your Webhook configuration, and you'll receive notifications when your balance reaches certain thresholds.

{
  "event_type": "HIGH_BALANCE",
  "event_id": "4b41ae03-01b8-4974-8d26-26a35d28851b",
  "timestamp": "2024-07-24T19:21:52.529Z",
  "entity_id": "WithdrawalRequest:01873482-fe4c-5da6-0000-f9c6e3892b54",
  "data": {
    "network": "MAINNET"
  }
}
{
  "event_type": "LOW_BALANCE",
  "event_id": "4b41ae03-01b8-4974-8d26-26a35d28851b",
  "timestamp": "2024-07-24T19:21:52.529Z",
  "entity_id": "WithdrawalRequest:01873482-fe4c-5da6-0000-f9c6e3892b54",
  "data": {
    "network": "MAINNET"
  }
}
Lightspark Connect provides just-in-time inbound liquidity. If your node doesn't have enough inbound capacity to receive a payment, Lightspark will automatically create a channel and provide sufficient liquidity to enable the transaction. This feature ensures smooth operation even during unexpected high-volume periods.
The following section covers withdrawing funds to L1.
Lightspark provides two security features to protect withdrawals:
-
Allow List: Account admins can edit a withdrawal address allowlist in the Lightspark dashboard. Lightspark will check all withdrawals against the allow list if any addresses are added to the allow list.
-
Operation Signing Key (OSK): All withdrawal API requests must be signed with your OSK.
You can use
requestWithdrawal to initiate a withdrawal from your Lightspark node defining the destination and amount to withdrawal:// Withdrawing to an L1 address
const withdrawal = await client.requestWithdrawal(
NODE_ID,
20_000,
"bcrt1qs758ursh4q9z627kt3pp5yysm78ddny6txaqgw",
WithdrawalMode.WALLET_THEN_CHANNELS,
);
This snippet initiates a withdrawal request for 20,000 satoshis to the given destination Bitcoin address.
Set up a webhook to track the status of your withdrawal, listen for the
WITHDRAWAL_FINISHED event:Here's what the event looks like:
{
  "event_type": "WITHDRAWAL_FINISHED",
  "event_id": "4b41ae03-01b8-4974-8d26-26a35d28851b",
  "timestamp": "2024-07-24T19:21:52.529Z",
  "entity_id": "WithdrawalRequest:01873482-fe4c-5da6-0000-f9c6e3892b54"
}
To process this event, follow the same steps as described in the Handling Webhook Events section above:
- Verify the event's authenticity
- Parse the event data
- Query the Lightspark API to get full withdrawal details using the
entity_id
You can find more information about configuring webhooks here.
The full Withdrawal object looks like:
{
  "id": "Withdrawal:018d9005-bbf8-1d02-0000-54b71d2c45e4",
  "createdAt": "2024-02-09T22:39:00+00:00",
  "updatedAt": "2024-04-25T20:37:22.275339+00:00",
  "status": "SUCCESS",
  "amount": {
    "originalValue": -80000000,
    "originalUnit": "MILLISATOSHI",
    "preferredCurrencyUnit": "USD",
    "preferredCurrencyValueRounded": -5270,
    "preferredCurrencyValueApprox": -5270.092226613966
  },
  "blockHeight": 829736,
  "destinationAddresses": [
    "bc1pw55k5693k5hqlj8qgtpec6defyjq54h0jdqyldz28nesk7anadrsk565rq",
    "bc1pdcz6ppqqvzg6me8cuu0dpr35swyqpjkc3wqkydwxxns0dnnjm83qw7nxuj"
  ],
  "originId": "LightsparkNodeWithRemoteSigning:018d4725-34a4-88df-0000-399e65a28da7",
  "typename": "Withdrawal",
  "resolvedAt": "2024-02-09T22:39:32+00:00",
  "transactionHash": "f1c78e159e88355283effc6f47f520a06a7c5339fa640f572a8a7f58c19c2897",
  "fees": {
    "originalValue": 0,
    "originalUnit": "SATOSHI",
    "preferredCurrencyUnit": "USD",
    "preferredCurrencyValueRounded": 0,
    "preferredCurrencyValueApprox": 0
  },
  "blockHash": "00000000000000000000b2927d2c7665dd513e8b2552427f3af4d231f92297cf",
  "numConfirmations": 24013
}
Withdrawal fees are assessed to the channel initiator. The fee amount is included in the withdrawal request response. Check the
fees field in the response to understand the cost of each withdrawal.In our next deep dive, we'll focus on sending and receiving payments.